But due to circumstances beyond my control (like Walmart's ugly choices of duct tape colors!) I had to actually do some fairly complicated crafting things (complicated for ME at least) to finally make this work out. But you know what? It DID work out! Better than I ever could have imagined. This was actually a real boost to my crafting ego. I might have to change the name of my crafting efforts to "Not The Craftiest of Crafters . . . BUT NOT THE WORST . . . Attempts To Craft". :-)

So, let's get crafting shall we?
This was my inspiration. A super simple iPad clutch/case from P.S. I Made This, made out of shelf/drawer liner and duct tape! How crazy cool is that???
I was ALL OVER this idea because I JUST got an iPad and the boring black case that came with it was, well, boring. I was completely up-to-date with shelf/drawer liner products, having recently used a LOT of it in my pantry and pots and pans cupboard makeovers.
And how hard could it be to find some cute duct tape???
HA! EXTREMELY hard in my case! I searched and searched my small town over and could only come up with these 4 colors (if you can call gray and black COLORS!) I couldn't even find any red!

It was quite frustrating because I had seen all KINDS of great colors online. ugh. Guess I should have just waited and ordered some. Or, maybe not.
Because if I hadn't been FORCED to "think outside the box" at this point . . . I would definitely not have come up with THIS!
Isn't it cute??? :-)
It ended up being a little more work than the duct tape version . . . but I am so happy with how it turned out . . . I don't even care. :-)
So, since this is the first craft type TUTORIAL I've ever attempted . . . I'm sure it will leave a lot to be desired. But I hope you can hang in there. I promise I'll get better!
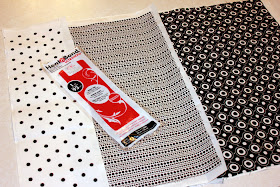
I then fused the fabric onto the shelf liner using a nifty product called Heat n Bond. This gave both the fabric and the liner some stiffness and sturdiness, necessary to protect "my precious".
It's a two-step process. First you iron the Heat n Bond paper onto the "wrong" side of the fabric.
Second, you peel the paper backing off and iron that side directly onto the shelf liner,
FUSING them together!
Here are all three pieces of fabric after they have been fused to the one piece of shelf liner.
Now that the "body" of the clutch is done...it's just a matter of finishing off the edges.
This took a bit more figurin' on my part...but I finally came up with a solution that, much to my surprise, actually worked....quite well!
I used another Heat n Bond product...this time the "tape" form. Using the same technique as above (ironing on, peeling off paper backing, ironing again to fuse together) I made a flap on each end. Then I added a piece of velcro as a closure.
Then to bind the edges and seal them, I used some extra wide bias tape
in a coordinating color and more Heat n Bond tape.
I fused bias tape to both long sides, then folded the long piece up to form the clutch, and "sealed" the sides with more Heat n Bond tape.
(And I realize my photos fall short of thoroughly tutoring this step....
so if you have questions...please ask away!)
And here it is....my first ever almost original piece of craftiness tutorial!
I hope you enjoyed!
(Because I might not be up to attempting another one for awhile!) :-)


This looks great! It looks pretty crafty to me and the directions are pretty clear. I got a sewing machine for Christmas per my request and it still kind of scares me so this I may have to try! The only things I've sewn have been bean bags for my 3 year old daughter who won't judge! =)
ReplyDeleteThank you Ali! You have bolstered my fragile crafty ego. ;-) I like to sew...sometimes. But I like stuff where I don't have to drag out "the beast" too.
ReplyDeleteDo you have a Home Depot or Lowe's close by? I've seen the patterned duct tape at both of those stores here in my little city.
ReplyDeleteGood job working with what you had! You ARE crafty!!!
I like yours better than the one with duct tape! But FYI here in Alaska I found the patterned duct tape at Joann Fabric it isn't cheap by any means so your way would be the more economical way to go as well as better looking in my book (E-book)!! Audrey
ReplyDeletehttp://cabinfeverreading.blogspot.com/
The zipper just broke on my Kindle so this crafting idea comes at just the right time. Silly question maybe, but how did you attach your little piece of Velcro for the flap? Thanks.
ReplyDeleteYou can find lots of different cute duct tape at Rue 21.
ReplyDeleteDear Anonymous, you can find velcro that has sticky on the back at wal-mart (at least that's where I bought mine).
ReplyDeleteI too like yours better, however, they have nice decorative Duct Tape at K-Mart Superstore. I think I will go with yours though, Thanks
ReplyDelete